Copyright© 2000 by Bernd R. Fix. All Rights Reserved.
 section ...
|
|
Java™-based development framework for PalmOS™ devices (PDAs) Copyright© 2000 by Bernd R. Fix. All Rights Reserved. |
|
Back to the
section ...
|
|
 |
DynaMID Early Access version (experimental)DynaMID is licenced to you under the terms of the Open Source Modified Artistic Licence and can be used as outlined in the Licence Agreement. For further information please feel free to contact me via email brf@brainon.ch |
Right now the DynaMID framework is in an early development stage, so it is intended for experienced Java developers only. I decided to let you take part in the development process this early to get your valuable feedback and suggestions.
|
|
|
||||||||||||
|
 |
First of all you need the MIDP reference implementation that is available at the
Sun website. If you are a Windows user and are interested in developing MIDP applications with Forte for Java, the J2ME™ Wireless Toolkit (current version 1.0.1) is probably the easiest environment to work with. Please follow the installation instructions as described on the website. Unfortunatly the J2ME™ Wireless Toolkit is not available for Linux from the Sun website. If you are interested in developing MIDP applications on Linux, please have a look at the MicroJava webpage. |
|
 |
To check your installation I recommend that you write a first small application
by following the instructions at
Sun's website. Make sure, everything is working properly. Make yourself familiar with the J2ME™ Wireless Toolkit integration into Forte for Java. It's a really nice development and testing environment (if you don't want to work under Linux; see above).
|
|
 |
Download the packed dynaMID directory and unzip the content into a directory of your choice. The directory <inst>\DynaMID has to be added to all your Forte projects that make use of the DynaMID framework. |
 Using the DynaMID framework
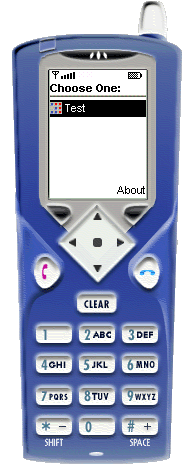
Only the most basic ideas will be explained here; there is a small sample application that comes with the DynaMID distribution. It consists of only two classes: a "start-up" class called Test and the actual page class called TestPage.
|
The application class
As you can see, there is not much action going on in this class (it's all behind the scenes, to be precise). All you as an application developer have to do is to initialize the base class with the application name and to add one or more pages to the application. The first page added will be the start-up page; if you want to use another page (added later) as a start page, you can call the run ("pagename") method to set the first page. |
|||||||
|
The page class
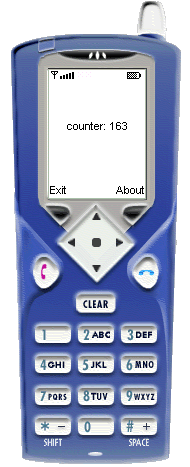
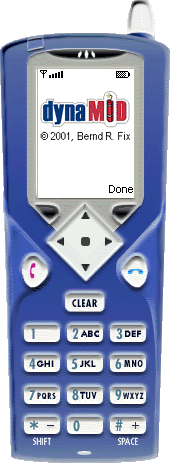
The page class defines two commands: An "Exit" command that will terminate the application and an "About" command that will show a (default) splash screen. There is one more attribute (counter) that will be used in the page thread as an "tick" counter and is displayed on the screen.
The page constructor initializes the base class and adds the defined commands.
Every page runs its own "worker" thread, that loops until the application is terminated. The tick() method of a page class is called for each such loop. If you want to display the result of your tick() method, you can call repaint() to force a redraw of the screen. Don't spent to much time in this routine, for the event handling is also running inside this loop! No events can be processed while your tick() method is running... So, if your computation takes longer, make sure you check for events and terminate the method, if there are any events pending. You can use something like:
Of course you have to make sure that your own loop doesn't consume too much time...
This method is called whenever the screen needs to be redrawn. No magic here...
The most important method is the handleEvent() method. It will receive any events sent by the device or the framework - especially the command events we have defined for the page. The sample application only handles the "Exit" command; the "About" command is handled by the page base class.
|
 Back to top of page ...