|
 Integrating DynaWorks into VisualAge Micro Edition 1.2
|
|
 Table of Contents
|
|
|

|
Installation
|
|
If you have not installed VAME 1.2 on your machine yet, this is the first thing to do:
|
|

Linux
|
-
Extract the application archive into the directory /usr/local:
$ cd /usr/local
$ tar xvzf /tmp/vame-linux-1.2.tar.gz
This will create an installation in the directory /usr/local/vame1.2.
-
Extract the runtime archive into the directory /usr/local/vame1.2:
$ cd /usr/local/vame1.2
$ tar xvzf /tmp/run-68k-palmOS-1.2.tar.gz
This will install all PalmOS™ runtime components in the directory
/usr/local/vame1.2/runtimes.
-
Set and export the environment variables IVEHOME for the directory
/usr/local/vame1.2/ive and VAMEHOME for the directory
/usr/local/vame1.2/ide. You also have to export the variable
LD_LIBRARY_PATH to the shared libraries. If you use for example bash,
you would add the following lines to the file ~/.bash_profile:
VAMEHOME=/usr/local/vame1.2/ide
IVEHOME=/usr/local/vame1.2/ive
LD_LIBRARY_PATH=$VAMEHOME:$IVEHOME/bin
export VAMEHOME IVEHOME LD_LIBRARY_PATH
-
Move the PalmOS class libraries to the $IVEHOME/lib directory:
$ cd /usr/local/vame1.2/runtimes/68k/palmOS/runtimes
$ mv ./ive/lib/* $IVEHOME/lib
$ rm -rf ./ive
|
|

Windows
|
- Run vame-ide-1.2.exe and install to directory <VAME>
-
Run run-68k-palmOS-1.2.exe and install the PalmOS™ runtime to
<VAME>\runtimes
- Set the environment variable IVEHOME to the directory <VAME>\ive
Please read the installation manuals and additional information that comes with IBM's
VisualAge MicroEdition 1.2 package for more information.
|
|
 Back to top of page ...
|
|
|
Installing DynaWorks for J9
|
|
The next step is to install DynaWorks:
|
|
Linux
|
-
Copy the file J9.DynaWorks.jar into the directory
$IVEHOME/lib/jclPalmXtr
-
Copy the file J9DW.resources.zip into the directory
$IVEHOME/lib/jclPalmXtr
-
If not already available, install pilrc-2.4-1.i386.rpm
-
Set and export the environment variable J9APPS. This variable should
point to the directory where compiled applications will be stored.
J9APPS=~/pilot/apps
export J9APPS
|
|
Windows
|
-
Copy the file J9.DynaWorks.jar into the directory
<VAME>\ive\lib\jclPalmXtr
-
Copy the file J9DW.resources.zip into the directory
<VAME>\ive\lib\jclPalmXtr
-
Unpack the archive PilRC.zip into the directory
<VAME>\ive\bin
-
Set the environment variable J9APPS to the directory where
the compiled Palm apps should be stored.
|
|
Back to top of page ...
|
|
|
Setting up a J9 / DynaWorks environment
|
|
-
Start VAME 1.2 with a new (empty) workspace
-
Add the Palm eXtreme library (from the menu choose Selected->Add->Project)
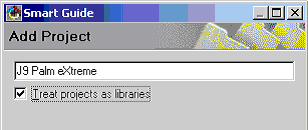
Click on Finish and then select the entry J9 Palm eXtreme in the project window. From
the menu choose Selected->Import:
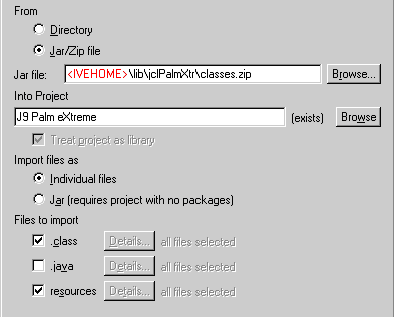
Click on Finish to import the file into the workspace.
-
Add the DynaWorks library
From the menu choose Selected->Add->Project:
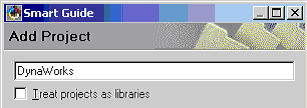
Click on Finish and then select the entry DynaWorks
in the project window. From the menu choose Selected->Import:
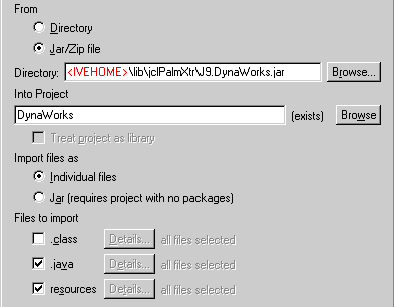
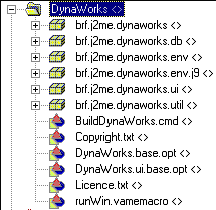
Click on Finish to import the file into the workspace. If you expand
the entries in the DynaWorks project list you
should see the following structure:
-
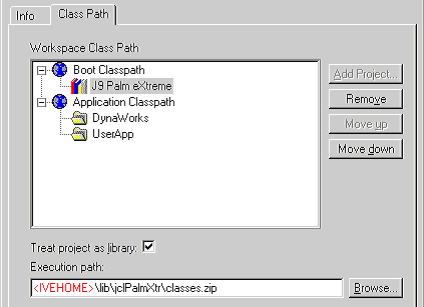
Prepare the classpath settings
Select the menu function Workspace->Properties to adjust the workspace
classpath settings. Select the Class Path tab and a dialogbox will pop up:
Select the J9 Pam eXtreme entry and move it up to the Boot Classpath
section. In the field Execution path select the associated Zip archive:
-
Adding more class libraries
If your projects require additional class libraries you can add them to the workspace.
DynaWorks can be used with other class libraries without any
known problems.
-
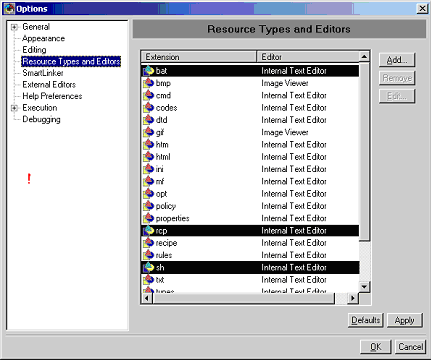
Set the Resource Types and Editors for additional resources
DynaWorks uses additional resource types. To see
(and edit) these resources you have to tell VAME what to do with them.
Select the menu function Window->Options... Then select the entry
Resource Types and Editors from the tree on the left and make sure
that the entries for bat, rcp and sh exist and are
linked to the internal text editor:
-
Check the DynaWorks installation
To check the correct setup and installation please select the
runWin.vamemacro resource in the DynaWorks
project and run this macro. If everything is fine,
you should have two new files in the J9APPS directory:
j9DynaWorks.prc	(base classes, ~36kB)
j9DW_UI.prc	(graphical user interface, ~36kB)
|
|
Back to top of page ...
|
|
|
Creating a new user project
|
|
-
Adding a new project
From the menu choose Selected->Add->Project:
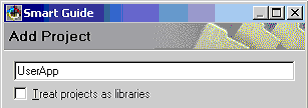
Click on Finish and then select the entry UserApp in the project window.
To import the resource templates that come with DynaWorks, you use the
menu function Selected->Import:
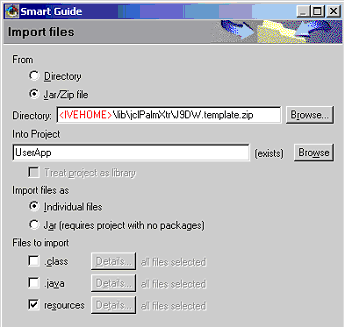
Click on Finish to import the resources from the template archive. If you expand
the UserApp entry in the project list, your UserApp structure should look like this:
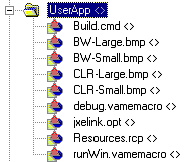
The following files have to be customized:
- runWin.vamemacro
Cange the placeholder <AppName>
- jxelink.opt
Cange the placeholder <ClassName> and <AppName>
The following files could to be customized:
-
*.bmp
Icons for the application (If you change these bitmaps,
you have to re-import them into the project!!)
-
Build.cmd
Windows script to compile the application. You can change this script to match your needs.
-
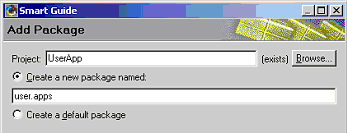
Add a package to your project
Select the UserApp project in the project list and invoke the menu
function Selected->Add->Package
-
Add a startup class to your project
Select the package user.apps just created and select the menu
function Selected->Add->Class:
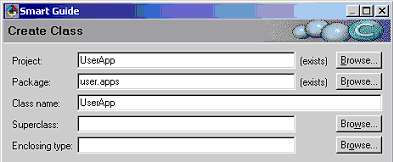
Click on Finish to create the class.
-
Fill in the application code
package user.apps;

import brf.j2me.dynaworks.*;
import brf.j2me.dynaworks.env.*;
import brf.j2me.dynaworks.env.j9.*;
import brf.j2me.dynaworks.util.*;

public class UserApp extends J9Wrapper {

  public static void main (String[] args) {

    // due to a bug in J9 you need this line
    Environment.setImpl (new J9Impl ());

    // application code goes here...
  }
}
This is all that changed with the J9 version of DynaWorks (more or less).
On how to write DynaWorks applications in general please read more at the
Overview section...
|
 section ...